


IKEA SOCKER Greenhouse: A Practical Setup for Small Plants

TL;DR
Use the SOCKER as a sheltered space for small plants, not a permanently sealed water container. Give it suitable light, check the temperature inside, keep conventional pots above runoff and leave room to lift individual plants out.
Start with the space
If you already own a SOCKER, check its model information and assembly before adding equipment. The IKEA instructions show its assembled structure and access arrangement. [1] Measure the usable floor and headroom, particularly if you plan a stand or humidity domes.
Choose a level surface that tolerates occasional watering mishaps. Keep power connections clear of the greenhouse base and use equipment appropriate for the environment.
Plan for the plants' next leaves. If everything already touches the panels, there is little space left for growth or maintenance.
Pick suitable plants
Small rooted Alocasia, compact tropical plants and individual propagation setups may fit well. Group plants with similar light and temperature needs, then keep their root-watering routines separate.
- Established small plants: arrange them where you can inspect leaves and moisture without moving every neighbour.
- Rooting cuttings: use clean individual pots and an appropriate rooting medium.
- Fresh tissue-culture plants: follow a dedicated acclimation routine. Being inside a SOCKER does not establish a known humidity level by itself.
- Plants with pest symptoms: keep them separate from the shared greenhouse until identified and managed.
Purdue's propagation guidance uses sheltered humidity to reduce water loss from cuttings, while keeping rooting medium aerated and the setup out of direct sun. [3] The useful lesson is to manage both air conditions and root moisture.
Light without overheating
Choose a bright position suitable for the plants. Direct sun through an enclosure can raise the temperature quickly, even when the room feels comfortable. Check the thermometer inside at leaf height, especially at the brightest part of the day.
If using a grow light, follow its placement and ventilation instructions. Begin with a moderate setting suited to the plants and check the nearest leaves for bleaching or damage. Do not rest hot equipment on a greenhouse panel or improvise wiring around water.
Leaves crowding the roof? Lower the stand, rearrange plants or move the tallest specimen out. Pressing foliage against a panel is not a way to make the enclosure larger.
Fit a workable floor
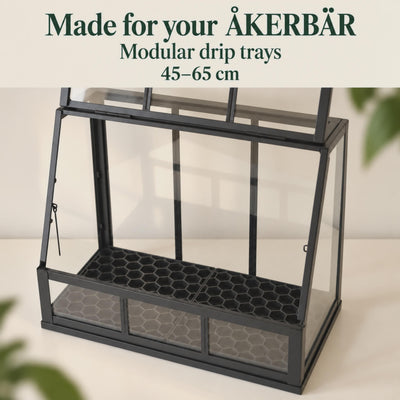
My SOCKER-compatible drip trays use two trays and two removable grids for the listed 45 cm (17.7 in) model. [2] Check your exact internal space before fitting them.
- Test the trays outside first. Use a modest amount of water on a protected surface and check underneath.
- Fit trays empty, then seat grids. Make sure nothing obstructs the opening or sits unevenly.
- Arrange larger pots first. Place smaller plants where you can reach them without brushing tender leaves.
- Test removal. Lift each pot once and make sure you can access the water beneath the grids.
Drainage trays collect water conveniently. Keep collected runoff below ordinary pot drainage holes and empty it before it reaches the grid or rim.
Check air and moisture
Use a humidity and temperature meter beside the plants. Record a normal daytime reading and a reading after the greenhouse has been closed. You are learning your setup, not chasing a social-media percentage.
If surfaces remain wet and leaves are crowded, increase opening or air exchange gradually. If a delicate baby plant wilts when the enclosure opens, check its root moisture and individual acclimation stage instead of shutting every established plant into the same conditions.
Condensation looks reassuring, but is the pot dry? Check it. Wet panels do not refill a root zone.
Water each plant according to its pot and medium. Move conventional pots out to water and drain when practical. Inspect individual reservoirs separately; humidity above and water below are different checks.
A short maintenance round
- Look: inspect leaf undersides, new growth and the smallest propagation pots.
- Measure: check internal conditions during warm or bright weather and after changing lights or openings.
- Water selectively: assess each pot rather than watering the entire greenhouse because one plant is dry.
- Clean: remove debris, empty dirty runoff and wash trays when residue appears.
- Make space: move plants on when they outgrow the enclosure.
Common myths
- “Seal every gap and it becomes a perfect propagation box.” Measure conditions and maintain access. Different plants and stages need different transitions.
- “The sunniest window is always best.” Check internal heat as well as light.
- “All the plants inside can share one watering day.” Check together; water only the pots that need it.
FAQ
Can I keep fresh tissue-culture plants inside?
Yes, if the individual acclimation setup has suitable light, warmth and humidity. Use the complete tissue-culture guide rather than relying on the greenhouse alone.
Do I need a fan?
First assess spacing, openings and actual conditions. If adding one, choose suitable equipment and gentle circulation; avoid directing a drying stream at tiny plants.
What if plants outgrow it?
Move them gradually to an appropriate larger space or room position. If the air is much drier there, adapt the transition to their response instead of moving the whole collection overnight.
Ask a question
What plants, light source and internal temperature are in your SOCKER? Tell us whether the problem is heat, crowding, dry pots or persistent condensation so we can suggest a targeted change.
 IKEA MILSBO Tall Drip Trays: Fit, Watering and Cleaning
 IKEA ÅKERBÄR Drip Trays: Choose, Fit and Maintain Them
 How to Use a Plant Drip Tray Without Leaving Roots Sitting in Water
Comments