


Moving Alocasia from Soil to PON: Repotting and Aftercare

TL;DR
Remove loose old mix gently, preserve healthy roots and learn the new pot's moisture pattern. Keep the plant in familiar light while it settles. PON is a growing medium, not one universal watering system: a draining pot, a wick pot and a LECHUZA planter need their own water arrangements.
Is now a good time?
Choose a plant that is reasonably stable, with firm roots and ongoing growth, rather than converting your entire collection at once. Try one plant first and learn the routine. If yours is newly delivered, dehydrated or dealing with pests, address that immediate problem before adding an optional substrate change.
Root rot is different. If roots are already soft and collapsing, inspect and remove clearly dead tissue, then size the new growing pot around the roots that remain. Putting a badly damaged root system into a large pot of PON is not the same task as repotting a healthy plant. [2] [3]
In northern Europe, short winter days can mean slower growth even in a heated room. If this is an optional change, choose a period of active growth with dependable light and warmth. Water demand varies with growth and conditions; keep observing rather than carrying over your summer routine. [4]
Prepare your setup
- Identify the medium. Original LECHUZA-PON contains zeolite, pumice, lava and slow-release fertiliser. Other PON-style mineral mixes can have different ingredients and nutrient charges. Read the bag before adding feed. [1]
- Choose the growing size. Use an insert that holds the current roots comfortably with modest room around them. An oversized pot adds unused damp medium. [3]
- Prepare the water arrangement. Confirm the drainage, reservoir or wick system before lifting the plant from its old pot.
- Have tools ready. A bowl of lukewarm water, clean scissors, a tray for loose mix and the assembled new pot keep handling simple.
Follow the medium's preparation instructions. Avoid grinding particles down while handling them. If the bag is dusty, reduce airborne dust with careful handling and any preparation specified by the supplier. Do not soak a fertilised product for days on the assumption that every mineral medium needs the same treatment.
Cleaning the roots
Slide the root ball out, supporting it rather than lifting a heavy mass by the leaf stalks. Loosen material that comes away easily. Let lukewarm water soften stubborn areas and rinse gently.
Remove substantial loose organic material, but do not chase a spotless finish. A tightly packed old core can behave differently from the surrounding mineral medium, so loosen it where possible without tearing the roots. If it is inseparable from a delicate root system, pause and reconsider the degree of conversion rather than forcing it.
Afraid you will break the roots? Work in small sections and stop when you meet resistance. You are helping the plant move house, not preparing its roots for a toothpaste advert.
Firm roots can be stained by the old mix. Soft roots whose outer layer slips away need closer attention; trim clearly dead or rotted areas with clean scissors. [2] Skip aggressive brushing, strong water jets and routine chemical baths. The aim is useful living roots after the move.
LECHUZA's own planting instructions do not require completely removing all soil from the roots. [1] That is a useful correction to the online rule that one remaining speck guarantees failure.
Potting and watering
Add a little medium, position the roots naturally and fill around them gently. Keep the plant at an appropriate depth, with the crown above the surface. Settle particles without crushing or forcefully compacting them. Secure a support if needed so the plant is not wobbling and repeatedly disturbing new roots.
A conventional draining pot
Water through from above, let excess drain and discard runoff collected in the cover or saucer. [4] Check moisture within the root zone before watering again. A pale or dry-looking surface does not necessarily mean the whole pot is dry.
A wick-based self-watering pot
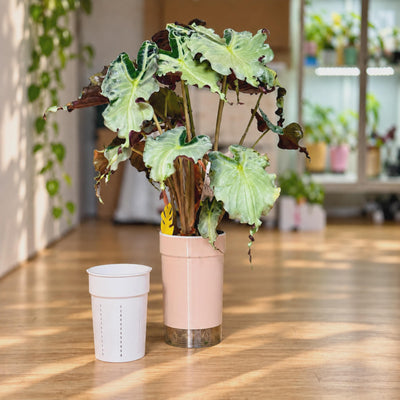
Wet the wick and make sure it reaches the reservoir and contacts the medium. For the Variegata Nordica signature kit, water from above and stop before the reservoir water reaches the coloured section. Its removable insert gives you access for checks while the visible reservoir makes the level easy to read. [5]
Check the root-zone moisture during the first refills. If water remains below but the upper medium stays dry, inspect the connection. If the medium remains heavily wet, do not keep topping up simply because you want a full reservoir.
A LECHUZA planter
Follow the instructions for the specific planter and irrigation system. The original PON page describes an initial top-watering phase for LECHUZA planters before using the reservoir; that manufacturer schedule is not a rule for every pot containing PON. [1]
The first few weeks
Make a brief daily check initially and take a comparison photo after potting. Keep light and temperature familiar. Do not add a stronger grow light, change humidity and double fertiliser on the same day.
- Moisture: is the root zone moist, drying or staying persistently saturated?
- Roots: where visible, are they firm, with developing tips, or deteriorating?
- Leaves: is one older leaf fading, or is the whole plant progressively declining?
- Water use: does the level change, and does that match how the medium feels?
Wait for the plant's response rather than unpotting it repeatedly to check whether it has “made water roots”. New roots and stable leaves are useful progress signs. A slightly unsettled leaf after handling deserves observation; continuing collapse deserves investigation.
Feeding? Check the medium's nutrient charge first. Original PON is sold with fertiliser for roughly six months, according to its manufacturer. [1] For unfertilised mineral mixes, choose a suitable nutrient plan; see the semi-hydro feeding guide.
If it starts struggling
- Wilting with dry root-zone medium: water appropriately for the system and check wick contact if used. Do not wait for an arbitrary “dry phase” to finish.
- Wilting with wet medium: check waterline and inspect the roots if decline continues. More water is not automatically helpful.
- Soft roots or base: inspect promptly, remove clearly dead tissue and adjust the growing size and moisture arrangement around the remaining roots.
- Brown tips after feeding: review the dose, any included fertiliser and mineral accumulation. Excess salts can interfere with water uptake, even when water is available. [6]
- No growth but stable leaves and firm roots: maintain suitable light and moisture; avoid repeatedly changing methods to provoke a faster result.
Roots need oxygen alongside water and nutrients. [7] The practical question is whether your actual pot and medium provide a workable balance, not whether every old root has been replaced on schedule.
Common myths
- “Every soil root has to die before semi-hydro works.” Keep healthy roots. A substrate transition is not an instruction to deliberately remove the plant's functioning root system.
- “Every trace of soil must come off.” Loosen substantial old mix without aggressive scrubbing. Even the manufacturer's planting instructions do not demand bare, spotless roots. [1]
- “Keep the reservoir dry for exactly three weeks.” Check your system's instructions and the root zone. A rigid countdown can leave one plant dry while another remains too wet.
- “PON means watering is impossible to get wrong.” Learn the waterline and moisture pattern of the assembled setup. The bag does not replace those checks.
FAQ
Should I convert a struggling plant to PON immediately?
First identify the problem. Root damage, pests, drying and low light need different actions. Repotting may be appropriate for damaged roots or failing medium, but an optional conversion should have a clear purpose.
Can I use PON without a reservoir?
Yes. The manufacturer lists conventional pots as an option. Water from above, allow drainage and monitor the medium rather than copying a reservoir routine. [1]
Can I use this approach for Monstera or Philodendron?
The gentle handling and system checks also apply to many other aroids. Adjust growing space, support and moisture to the actual plant. A small Alocasia and a large climbing Monstera will not use the same amount of water.
Ask a question
Before changing anything else, tell us your plant, days since repotting, exact medium and pot system. Is the root zone dry or wet when the leaves droop? Mention whether roots remain firm and whether the medium already contains fertiliser.
Sources
- LECHUZA: Original PON composition, included fertiliser and planting instructions.
- RHS: Repotting and root inspection.
- RHS: Overpotting.
- University of Wisconsin: Houseplant watering and repotting.
- Variegata Nordica: Signature pot contents and filling instructions.
- University of Maryland: Fertiliser toxicity and soluble salts.
- University of New Hampshire: Hydroponics at home, nutrients and oxygen.
 The Complete Guide to Acclimating Tissue-Culture
 What Size Self-Watering Pot Does Your Plant Need?
Comments