


Alocasia Corm Propagation: From First Roots to First Leaf

TL;DR
Start with a firm corm, a clean container and gentle, steady warmth. Use damp perlite or shallow water touching the base, keep the growing tip exposed and place it in bright indirect light. Check moisture daily without pulling it out. Pot up when several roots and a healthy shoot are developing, then gradually reduce the cover.
Check your corm
Those little rounded pieces around your Alocasia’s roots are often called corms or cormels. They are small storage stems with buds, not seeds. The stored reserves help support the first growth. [1] [2]
- Keep: firm, plump corms with intact flesh. Brown outer skin is normal; colour alone does not mean rot.
- Set aside: anything soft, leaking or sour-smelling. A corm that collapses under a gentle touch is a poor starting candidate.
- Collect gently: look during a planned repot rather than repeatedly disturbing the parent. Remove loose corms; leave tiny, firmly attached ones to develop. Wear gloves if cutting, as Alocasia sap can irritate skin. [3] [8]
Rinse off soil with room-temperature water. Remove loose, papery skin with your fingers, but don’t scrape into the flesh or pick at a bud. Keep existing roots intact. Label each container with the variety and starting date before they all become “the mystery corm”.
This method is for Alocasia corms. Other aroids use different starting material: a Philodendron stem cutting, for example, needs a node, the part of the stem where a leaf and bud attach. A leaf alone is not an interchangeable substitute. [4]
Choose a method
Start each corm in its own small container so you can check it and remove a problem corm without disturbing the others. Wash reused cups thoroughly and rinse away detergent. Choose one method and keep it consistent.
Damp perlite
Perlite is the lightweight white material used to create air spaces in potting mixes. Wet it before handling to keep dust down. [5]
- Use a small cup with drainage holes. Moisten the perlite, let excess water drain and place the cup in a clean tray.
- Nestle the corm into the surface with its base touching damp perlite and its growing tip exposed. Don’t bury it deeply or pack the granules tightly.
- Add a clear cover or place the cup inside a transparent propagation box. Keep water in the perlite, rather than leaving the cup sitting in a deep pool.
- Check daily. If the perlite around the base is drying, add a little water and drain the excess. Aim for moisture plus air space, not a flooded cup. [4] [5]
Shallow water
Prefer to see the roots clearly? Try a shallow-water setup: let water touch the base while keeping the growing tip above it. The depth depends on the corm and its support, so check contact rather than copying a fixed water measurement.
- Use a clean, clear cup and keep the corm upright. Mark the starting waterline on the cup.
- Check daily and top up before the base or emerging roots dry out. Replace water promptly if it becomes cloudy, slimy or unpleasant-smelling.
- As roots lengthen, keep them in contact with water; don’t raise the water over the shoot.
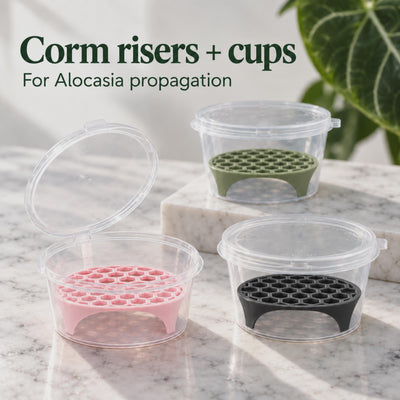
My corm risers with matching clear cups support the corm above the cup’s base, leaving space for roots to grow down and making the waterline easy to inspect.
Already succeeding with moss? Keep using it. Squeeze out excess water and arrange it loosely. When moving the plant later, leave firmly attached strands in place rather than tearing delicate roots to remove every last fibre.
Warmth and light
For a starting setup, aim for a steady warm room around 22–26°C (72–79°F). Check beside the cups, especially overnight: a windowsill can be much colder than the room. Alocasias need warmth, while general houseplant propagation guidance also favours warm rooting conditions. [3] [6]
A heat mat is useful when the location is cold, not compulsory. Use a thermostat and a probe positioned according to the equipment instructions. Avoid radiators and direct sun on a covered container, which can overheat it.
Choose bright indirect light, such as a bright window behind a sheer curtain. If using a grow light, follow its recommended distance and use a timer. Keep the developing shoot in the light rather than starting it in a dark cupboard. [6]
Daily checks
Lift the cover briefly each day to inspect moisture and growth. Condensation on the lid does not prove the base is wet, so check the waterline or medium itself.
- Good signs: a swelling bud, firm pale roots or a shoot slowly extending. Take a photo weekly to spot progress without lifting the corm.
- Adjust ventilation: if the shoot stays wet or water drips continuously onto it, increase the vent opening. Keep a humid space without stagnant, constantly wet growth. [7]
- Hold the fertiliser initially: a rootless corm does not need strong feeding. Begin feeding once the plant is rooted and actively growing, following a suitable product’s instructions. [2] [6]
Tempted to dig it up again? Check through the cup instead. Your corm does not need a daily performance review.
Potting up
Look for several developing roots, ideally beginning to branch, and a healthy emerging or open leaf. A lone new root is a reason to celebrate, not a deadline to repot. General propagation guidance recommends moving plants on once roots and shoots show strong active growth. [7]
- Choose a small pot that accommodates the roots with a little room around them. Use a fine enough, airy houseplant mix to contact the delicate roots; avoid burying them among only large bark chunks.
- Moisten the mix first. Lift with a spoon or support the root mass from underneath, keeping attached medium where possible. Keep the shoot above the surface and don’t compress the mix.
- Water gently and let excess drain. Keep it in the same light initially, with its cover still available.
- Open the cover gradually over the following days. If the leaf wilts while the medium remains moist, reduce the opening and try a smaller increase later. Don’t respond by flooding the roots. [4] [8]
Keep the cover fully off once the plant remains upright and comfortable through the day. Increase pot size as the root system develops, rather than starting the baby in a large adult planter.
Troubleshooting
Firm, but nothing is happening
Check the overnight temperature and whether the base actually contacts moisture. Correct either problem, then leave the setup stable. Allow several weeks; don’t discard a firm corm just because somebody else posted a leaf after fourteen days. Elephant-ear storage organs can take weeks to produce their first leaves. [8]
White fuzz appears
Move the affected cup away from the others. Inspect the corm gently: loose surface growth and a firm corm are different from soft, decaying flesh. Rinse away loose growth, use a clean cup and fresh medium or water, and improve ventilation. If the flesh is soft or the growth returns alongside deterioration, discard it. Clean equipment and airflow matter in propagation. [7] [9]
The corm becomes mushy
Remove it promptly, discard the water or medium and clean the container before reuse. Don’t leave a collapsing corm in a shared propagation box. For the remaining cups, check for excessive water, cold conditions and poor ventilation. [3] [9]
Common myths
- “If you don’t peel the brown skin, it won’t sprout.” A corm naturally has a protective outer covering. Loose skin can be removed gently, but brown skin alone is not a fault to fix. Don’t gouge healthy flesh while chasing an online promise of faster growth. [1]
- “Seal the container and leave it untouched until leaves appear.” A cover helps retain moisture, but you still need to check the water supply and watch for decay. Vent daily; increase airflow if growth stays wet. [7]
- “No leaf after two weeks means it has failed.” A calendar is not a viability test. Check firmness, roots and the growing tip. Correct cold or dry conditions before giving up on a slow but intact corm. [8]
FAQ
Which end goes up?
Look for the emerging bud, often the pointed end; keep it uppermost. If the shape is unclear, rest the corm on its side in damp perlite with its upper surface exposed. Don’t cut it open to find out. A visible shoot will make orientation clearer. [1]
Can I grow corms in winter?
Yes, if you can maintain warmth and adequate light. In European or northern US winters, check cold glass, overnight temperature drops and short daylight before blaming the corm. A grow light can help when the window is dim. [3] [6]
Should I change medium when growth is slow?
First check temperature, moisture contact and firmness. If those are suitable and the corm remains intact, give it time. Change the setup when you identify a problem, such as repeated drying or deteriorating medium, rather than transferring fragile new roots every few days.
Ask a question
Is yours growing roots but no leaf, or sitting completely still? Leave a comment with the variety, starting date, method, temperature and whether the corm is firm. Those details help turn “it won’t grow” into a useful next step. If you try the guide, tell us which method you chose and when you noticed the first change.
Sources
The anatomy sources explain what a corm is. The propagation sources support the general moisture, hygiene and aftercare principles; they are not comparative trials of every Alocasia corm method.
- University of Florida, University of Kentucky and Texas A&M: Corms.
- University of Minnesota: Unique storage organs.
- RHS: How to grow alocasias.
- NC State Extension: Propagation.
- Iowa State University Extension: Potting media, components and handling.
- Iowa State University Extension: Houseplant stem-tip cuttings.
- RHS: Propagation techniques.
- University of Wisconsin Extension: Elephant ears.
- RHS: Damping off and propagation hygiene.
 The Puddle Method for Alocasia Corms: Rooting Without Rot
 How to Do the Puddle Method for Alocasia Corms
 The Complete Guide to Acclimating Tissue-Culture
Comments