


Watering Plants in a Cabinet: Moisture Checks and a Simple Routine

TL;DR
Schedule checks, not automatic watering. Assess each pot's root-zone moisture, distinguish intentional reservoirs from trapped runoff and include water coming down moss poles. Cabinet humidity changes water loss, but it does not tell you which roots need a drink.
Why the routine changes
A cabinet changes light, temperature, humidity and air movement around the plant. Water use depends on those conditions as well as the plant, medium and pot. [1] A small cup under a warm light can dry quickly while a larger shaded pot remains wet.
Do not assume every pot dries twice as slowly. Instead, learn the new pattern after moving plants inside. Keep their locations stable while you compare the first few watering cycles.
This applies to Alocasia, Monstera, Philodendron and other tropical plants. The shared cabinet does not make their root systems or water demands identical.
Learn each pot
Start with three observations rather than relying on condensation alone:
- Weight: learn how the assembled pot feels after watering and drainage, then as it becomes lighter. Compare the same pot, not two pots of different materials.
- Moisture below the surface: feel accessible mix or use a wooden skewer carefully away from major roots. A dry surface can sit above a damp centre.
- Water arrangement: inspect the reservoir or lift the inner pot to find hidden runoff.
Clear walls can make some checks convenient, but a visible wet wall does not map every part of the root ball. Use several clues together.
Iowa State describes different moisture levels within container media, with complete saturation limiting oxygen near roots. [3] The useful goal is an appropriate moisture range for your plant and system, not a universal demand to dry every pot halfway down.
Not sure what “light enough” feels like? Make a note after an evenly watered pot has drained, then compare it before the next needed watering. Your hands can learn this more reliably than a copied calendar.
A simple checking round
Use this practical routine while establishing the cabinet. It is a suggested way to organise observations, not a fixed scientific watering schedule.
- Look at the plants. Note new growth, drooping, damage or a cup that has moved.
- Check the small setups first. Propagation cups and newly moved plants deserve close attention while you learn their moisture pattern.
- Assess each established pot. Compare weight, deeper moisture and water level with its previous check.
- Water only the setups that need it. Use the appropriate method below and keep track of runoff.
- Check beneath trays. Remove unintended pools, wipe spills and confirm that cords and connections remain dry.
A quick daily look is useful initially. Once patterns are clear, adjust the frequency of hands-on checks to the setup. A plant suddenly changing behaviour deserves a fresh assessment.
Ordinary draining pots
When watering is needed, wet the root zone evenly and allow excess to leave the drainage holes. Empty collected water from the cover or saucer. Trapped runoff can keep a conventional pot saturated and damage roots. [2]
If moving the pot is manageable, water outside the cabinet and return it after drainage. If roots or a large support make that impractical, use a controlled amount and an accessible catch tray, then remove the runoff.
Water races down the sides but the centre stays dry? Apply it slowly in stages. A severely dried mix may need a brief soak in a draining pot, followed by thorough drainage, rather than another fast pour. [2]
Do not treat frequent small surface splashes as evidence that the entire root ball has been watered.
Reservoir pots
An intentional self-watering reservoir is different from runoff trapped around an ordinary nursery pot. Check the system's instructions, wick contact and waterline.
- Water below, moist medium above: observe water use and refill according to the system.
- Water below, dry root zone above: inspect the wick and contact. Correct that connection while supplying appropriate root-zone moisture.
- Wet medium, little water use and a declining plant: inspect the waterline, roots and growing conditions before topping up again.
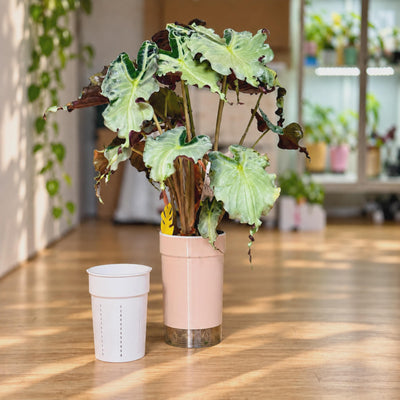
For my signature pot, water from above and stop before the reservoir reaches the coloured section. Its visible reservoir and removable insert make those checks accessible. [7]
Use the self-watering setup guide for a fuller refill and troubleshooting routine.
Cups and moss poles
Propagation cups
Check root moisture independently of humidity under the dome. Condensation is not a refill instruction. Keep the growing point clear of excess water and follow the cup's intended wick or drainage arrangement.
A newly rooted corm and an established plant need separate checks. If opening the cover makes a baby plant droop, assess the humidity transition as well as the medium before adding water.
Moss poles
Water travelling through a pole may enter the pot below. Check that pot before filling the upper cup and count the runoff as part of the watering.
If the top moss needs moisture but the pot is already wet, avoid repeatedly flooding the whole setup. Where the design allows, moisten the dry section carefully and review the water path. The moss-pole watering guide explains the first-watering test.
Trays and air movement
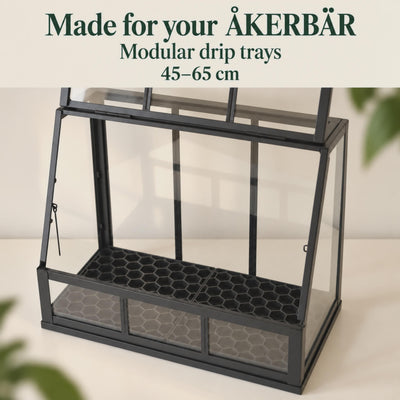
Make collection trays easy to inspect and empty. For my ÅKERBÄR and SOCKER drip trays, removable grids provide access to the water below. [6] Keep ordinary draining pots above accumulated water, rather than accidentally turning their drainage holes into a standing-water bath.
Give leaves room and use gentle circulation. An internal fan moves air; changing how the cabinet exchanges air with the room is a separate adjustment. After either change, recheck the small cups because their drying pattern may change.
A fan is not a repair for a blocked drain. If a pot has trapped runoff, remove it. If the medium is heavily compacted, review the potting setup. Pressing a mix tightly reduces useful air spaces. [4]
When something goes wrong
- Drooping and dry medium: water the roots appropriately, then inspect the wick or uneven wetting if the problem repeats.
- Drooping and wet medium: check runoff and waterline. If decline continues, inspect roots rather than watering again.
- Soft roots or a soft base: remove clearly dead tissue with clean tools, use a growing pot appropriate to the remaining roots and correct the moisture arrangement.
- Blisters becoming corky: consider edema, especially when water uptake exceeds loss. Review moisture and watch new growth; not every leaf mark is a pest. [5]
- Leaf-tip drips without other decline: check the setup, but do not automatically diagnose rot. See the guttation guide.
If the same correctly sized pot repeatedly stays wet and declines, review the medium and conditions. Make a modest, recorded change rather than switching the whole collection overnight. The potting-mix guide offers a simple starting recipe and adjustments.
Common myths
- “High humidity means no root watering.” Check the medium and roots. Humid air does not tell you whether a pot contains available water.
- “Every cabinet plant should dry halfway down.” Match checks to the plant, medium and irrigation method. Tiny propagation roots and established reservoir plants need different care.
- “PON supplies exactly what the plant needs automatically.” The water arrangement still matters. Inspect moisture where roots are growing rather than relying on the medium's name.
- “A bigger fan fixes overwatering.” Remove trapped runoff and address the pot first. Air movement and drainage are different parts of the setup.
FAQ
Should I water everything on the same day?
You can check everything during the same round. Water only the pots that need it. Marking the last watering or refill date helps you spot changes without turning that date into an automatic instruction.
Is water under a grid always a problem?
No. Some trays intentionally hold water beneath elevated pots. Check the design, level and pot contact. Keep conventional drainage holes clear of unintended standing water and maintain access for cleaning.
Should I switch every cabinet plant to semi-hydro?
Choose a method you can monitor consistently. A suitable potting mix and draining pot are workable options too. Trial a new method on one plant before changing a collection that already has a manageable routine.
Ask a question
Tell us your plant, pot type, medium and cabinet conditions. Does the centre stay wet, does a reservoir empty unusually fast, or is water bypassing the medium? Include any recent fan, light or moss-pole change so we can help narrow down the next check.
Sources
- Virginia Cooperative Extension: Container houseplants, moisture and environmental conditions.
- University of Connecticut: Houseplant watering and hidden runoff.
- Iowa State University: Watering containers and assessing moisture.
- Iowa State University: Potting-media structure and handling.
- University of Maryland: Edema in indoor plants.
- Variegata Nordica: Modular drip trays with removable grids.
- Variegata Nordica: Signature pot waterline and removable insert.
 Square or Round Pots? Plan a Plant Shelf That Actually Works
 IKEA MILSBO Tall Drip Trays: Fit, Watering and Cleaning
Comments